Kubernetes Crash Course
Introduction
Containerization has become the de facto standard for packaging and running applications. However, containerization alone is insufficient; we need an additional orchestration layer to provision and manage all containers. This is why several solutions have been developed, one of which is…
Kubernetes is a powerful container orchestration platform, and in this article, we will become more familiar with it. We will cover the following topics:
- An overview of core functionality
- How to run a cluster both in the cloud and on a local machine
- References to more advanced topics
- Links to additional resources

Containers
Before diving into Kubernetes itself, let’s quickly review what containers are.
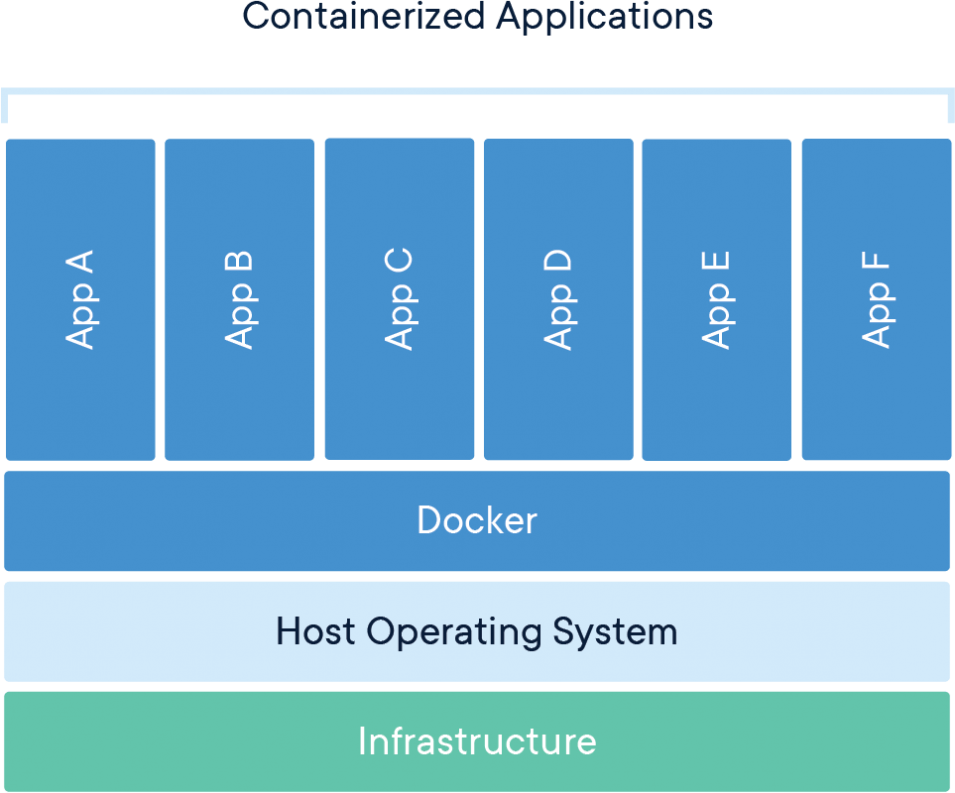
A container is a standard unit of software that packages up code along with all its dependencies, ensuring that the application runs quickly and reliably across different computing environments. A Docker container image is a lightweight, standalone, executable package of software that includes everything needed to run an application: the code, runtime, system tools, system libraries, and settings.
Container images become containers at runtime. In the case of Docker containers, images transform into containers when they run on the Docker Engine. Containerized software can run consistently on both Linux and Windows-based applications, regardless of the underlying infrastructure. Containers isolate software from its environment and ensure that it operates uniformly, despite differences - for instance, between development and staging environments.
While Docker is the most popular containerization technology, there are other alternatives gaining traction as well, such as Podman and containerd.
Benefits of Containerization:
- Less Overhead: Containers require fewer system resources than traditional hardware virtual machine environments since they do not include operating system images.
- Increased Portability: Applications running in containers can be easily deployed across multiple operating systems and hardware platforms.
- More Consistent Operation: DevOps teams can rely on the fact that applications in containers will function the same way, regardless of their deployment environment.
- Greater Efficiency: Containers enable applications to be deployed, patched, and scaled more rapidly.
- Improved Application Development: Containers support agile and DevOps initiatives, accelerating development, testing, and production cycles.
Running containers manually from the command line is straightforward; you simply type docker run image-name and you are ready to go. However, imagine needing to run hundreds or thousands of containers. Would you want to execute those commands manually? No. This is why additional tools such as Docker Compose and Docker Swarm were developed to facilitate the rapid management of containers at scale.
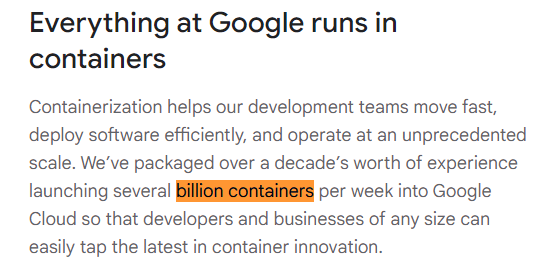
But when you reach the scale of Google, even those solutions may not suffice.
Kubernetes
You can find some documentary videos about the history of Kubernetes in the additional resources section, so I won’t elaborate too much here. I will only mention that Kubernetes was created by Google to address the challenges they faced in managing containers at scale.
By definition, Kubernetes, also known as K8s, is an open-source system designed for automating the deployment, scaling, and management of containerized applications.
Essentially, you create a Kubernetes cluster, define the containers you need to run, and Kubernetes takes care of the rest.

It sounds awesome and simple (and it is for core use cases), but for certain advanced topics, the learning curve can be steep and requires considerable effort. More on that later.
Let’s take a look at the architecture of a Kubernetes cluster:
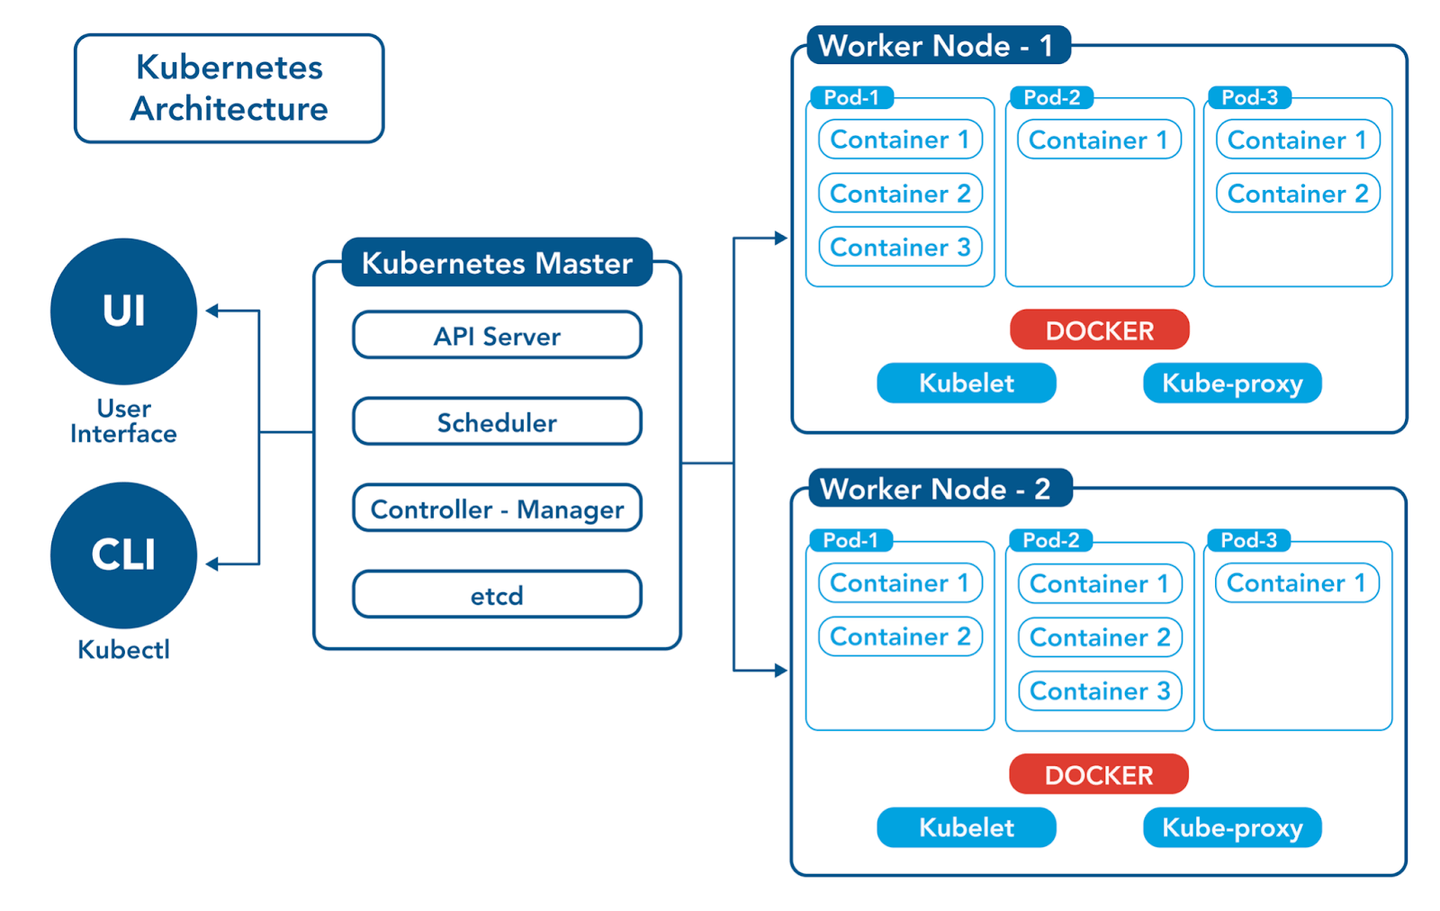
The Kubernetes master server consists of what is known as the control plane, which includes several components: an API server that accepts queries, a scheduler that allocates containers to nodes, and etcd for storage, among others.
In addition to the control plane, there are multiple worker nodes where the containers actually run. Depending on the size of the cluster, we can have a few or many nodes to meet the required capacity. Each node has a container runtime (e.g., Docker), the kubelet (an agent that manages the creation and destruction of containers), and the kube-proxy, which is responsible for establishing communication with other nodes and containers (e.g., one container calls another via TCP).
Now the question is: how do I instruct Kubernetes to run containers?
The answer is: via YAML files.
Everything in Kubernetes is defined declaratively. We specify what we need to have running in YAML files called manifests, which we then pass to Kubernetes using the kubectl CLI. Kubernetes ensures that everything is provisioned and running successfully, provided that we submit valid YAML files.
The next question is: what do we include in those YAML files?
The answer is a list of objects. Kubernetes has several objects that can be provisioned:
- Pod: A pod is one (or more) containers running as a single unit. It is the smallest resource that can be created in Kubernetes. The control plane analyzes which worker node has enough capacity and instructs the selected node to create the required pod.
- Deployment: A deployment is defined when we want to run multiple instances (pods) of a single image (e.g., if we want to have three containers of our API). The deployment ensures that we always have the desired number of pods (i.e., it creates new ones if any pods crash) and can perform rolling updates to maintain zero downtime.
- Service: A service acts as a load balancer between pods, providing a single entry point to the application.
- Ingress: An ingress acts as a gateway that accepts inbound traffic to the cluster and routes it to a specified service.
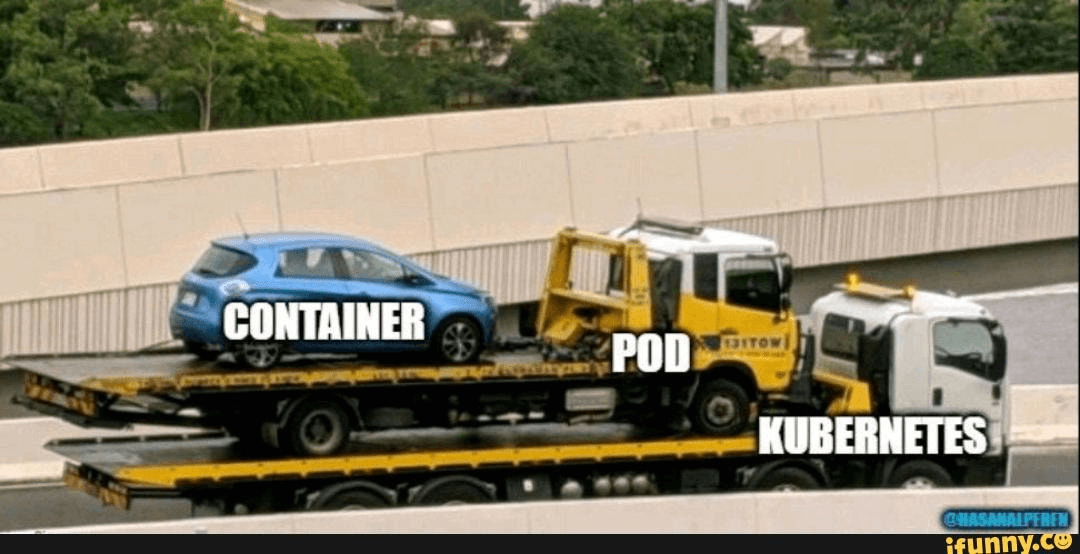
There are many more types of objects in Kubernetes (and you can even create custom ones), but we won’t cover those here.

Enough theory (for now) - show me the code!
Hello, NGINX
Goal: Let’s provision a simple application - an NGINX HTTP server that serves a static website.
To create this application, we need the following objects:
- Deployment - to ensure we have some containers running.
- Service - to allow our containers to accept requests.
Here is the YAML manifest where we declare these objects:
apiVersion: v1
kind: Service
metadata:
	name: my-nginx
	labels:
	run: my-nginx
spec:
	type: LoadBalancer
	ports:
	- port: 80
	targetPort: 80
	protocol: TCP
	name: http
	selector:
	run: my-nginx
---
apiVersion: apps/v1
kind: Deployment
metadata:
	name: my-nginx
spec:
	selector:
	matchLabels:
	run: my-nginx
	replicas: 1
	template:
	metadata:
	labels:
	run: my-nginx
	spec:
	containers:
	- name: nginx
	image: nginx:1.23.3
	ports:
	- containerPort: 80
To provide this YAML to Kubernetes, let’s create a file called nginx.yaml and pass it to Kubernetes using the kubectl CLI:

Use the external IP 172.19.255.200 to test the application:

Awesome demo! 🎉
Kubernetes locally
There are several ways to create your own Kubernetes cluster on a local machine:
- Docker Desktop: This option has a built-in ability to run Kubernetes. You can find more information here.
- kind: This is my preferred method for running Kubernetes locally, as it is simple and supports the main objects, including pods, services, and ingress.
- Minikube : A widely used tool for running Kubernetes clusters on local machines.
- MicroK8s: This is a lightweight, zero-ops Kubernetes solution for developers, edge computing, and IoT.
- Alternatively, there’s also K3s (and k3d), which is designed for running controllers and workloads in resource-constrained environments.
If you are looking for a fully-fledged cluster, consider the last two options.
Skaffold
Typically, we develop applications by running them locally as a stand-alone process. Once development is complete, we build an image and deploy it to a containerization platform. If we want to deploy changes to our local cluster, we need to:
- Build an image.
- Push it to a container registry (e.g., using kind load).
- Update the manifest to match the new image tag.
- Apply the manifest.
If we were to perform these steps manually, it would take time, require custom automation scripts, and extend the feedback loop.
But fear not! The Skaffold tool was created to address this issue. This tool automates the workflow of developing and testing containerized applications. Once a Skaffold configuration file is created (containing the directory name, Dockerfile, and manifest locations), the tool automates the following steps:
- Watch the directory for code changes.
- If changes are detected, build an image with a new unique tag.
- Apply the manifest with the updated image tag.
This makes local development a breeze and allows developers to focus on writing code. A guide on how to get started with Skaffold can be found here.
Kubernetes in cloud
All major cloud providers offer some form of managed service for running Kubernetes:
- Amazon Elastic Kubernetes Service (EKS)
- Azure Kubernetes Service (AKS)
- Google Kubernetes Engine (GKE)
Infrastructure-as-Code can be used to automate the provisioning of these clusters:
- Terraform has a module for creating Amazon EKS clusters, which you can find in the Terraform Registry.
- Pulumi also offers a module for EKS, which can be explored here.
If you want to create your own EKS cluster and experiment with it, check out the following resources:
- Create Cluster: Provision an EKS Cluster (AWS) | Terraform | HashiCorp Developer
- Ensure you have the latest AWS CLI installed.
- Learn More: Discover how to use Kubernetes in AWS by visiting the EKS Workshop.
Advanced Topics
Service Mesh
You have your cluster running, successfully deploying and running containers, and you’re enjoying a happy life. But one day, security engineers approach you and say:
Hey, we need to ensure that our services inside the cluster communicate using secure channels - mutual TLS is necessary for that. We also need to configure access controls to define which services can call other services.
Then, an architect comes to you and adds:
Hi, since we have a microservices architecture, we need to establish circuit breaker and rate limiter patterns, configure timeouts, and ensure robust observability by monitoring key metrics to maintain our Service Level Objectives (SLOs).
You hear all this and start thinking…

What is a service mesh?
Modern applications are typically architected as distributed collections of microservices, with each collection performing a specific business function. A service mesh is a dedicated infrastructure layer that you can add to your applications. It allows you to transparently integrate capabilities like observability, traffic management, and security without modifying your own code. The term “service mesh” refers both to the type of software used to implement this pattern and to the security or network domain created when using that software.
As the deployment of distributed services, such as in a Kubernetes-based system, scales in size and complexity, it can become increasingly challenging to understand and manage. The requirements may include service discovery, load balancing, failure recovery, metrics collection, and monitoring. A service mesh often addresses more complex operational needs like A/B testing, canary deployments, rate limiting, access control, encryption, and end-to-end authentication.
Service-to-service communication is essential for enabling a distributed application. Routing this communication - both within and across application clusters - becomes progressively intricate as the number of services increases. Istio helps simplify this complexity while alleviating the burden on development teams.
Some popular service mesh solutions include:
- Istio (tested with kind locally).
- Linkerd.
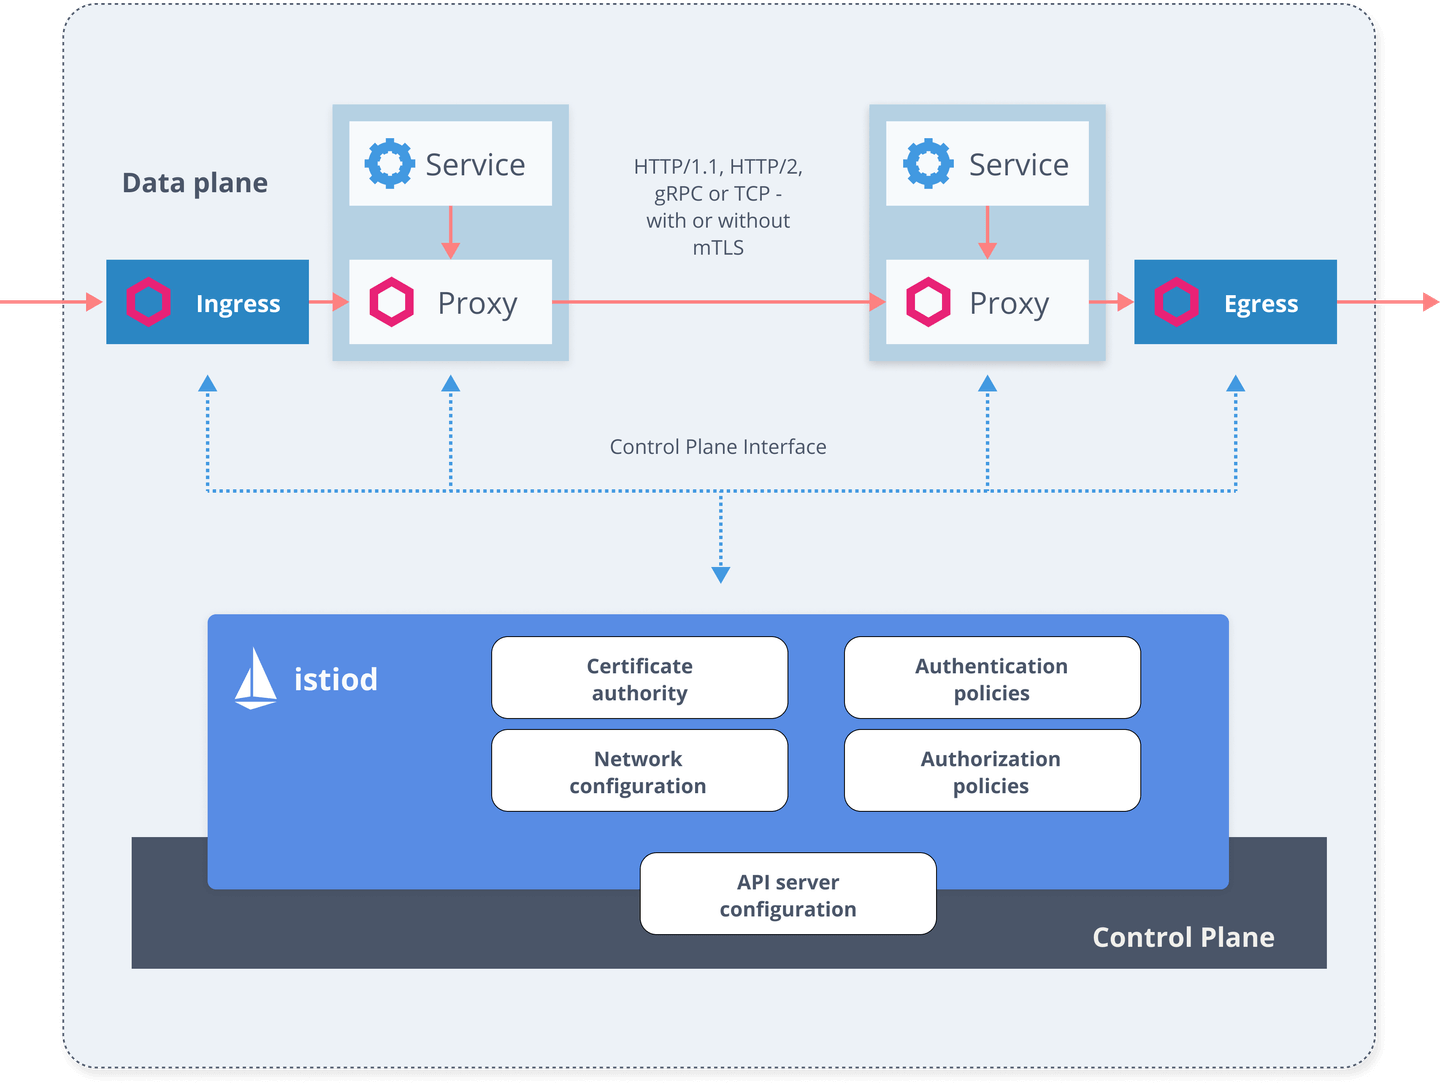
Istio consists of two main components: the data plane and the control plane.
The data plane is responsible for the communication between services. Without a service mesh, the network does not recognize the type of traffic being sent and cannot make informed decisions based on the traffic’s nature or its source and destination. The service mesh utilizes a proxy to intercept all network traffic, enabling a wide range of application-aware features based on the configuration you set.
An Envoy proxy is deployed alongside each service that you run in your cluster or operates alongside services running on virtual machines (VMs).
The control plane takes your desired configuration and its view of the services, dynamically programming the proxy servers and updating them as rules or the environment change.
While the usage of a service mesh offers numerous benefits, setting it up and managing it involves a steep learning curve.
Helm
Now that you’re getting accustomed to writing numerous YAML manifests, you begin to realize, I'm duplicating YAML code all over the place. This isn't the right approach, is it?

There are several tools designed to help create reusable templates for your YAML manifests:
- Kustomize: With Kustomize, you can create a base manifest and then patch it with environment-specific values.
- Helm: Helm allows you to create reusable templates called “charts.” You can create your own charts or utilize existing ones (e.g., a chart for the ELK stack).
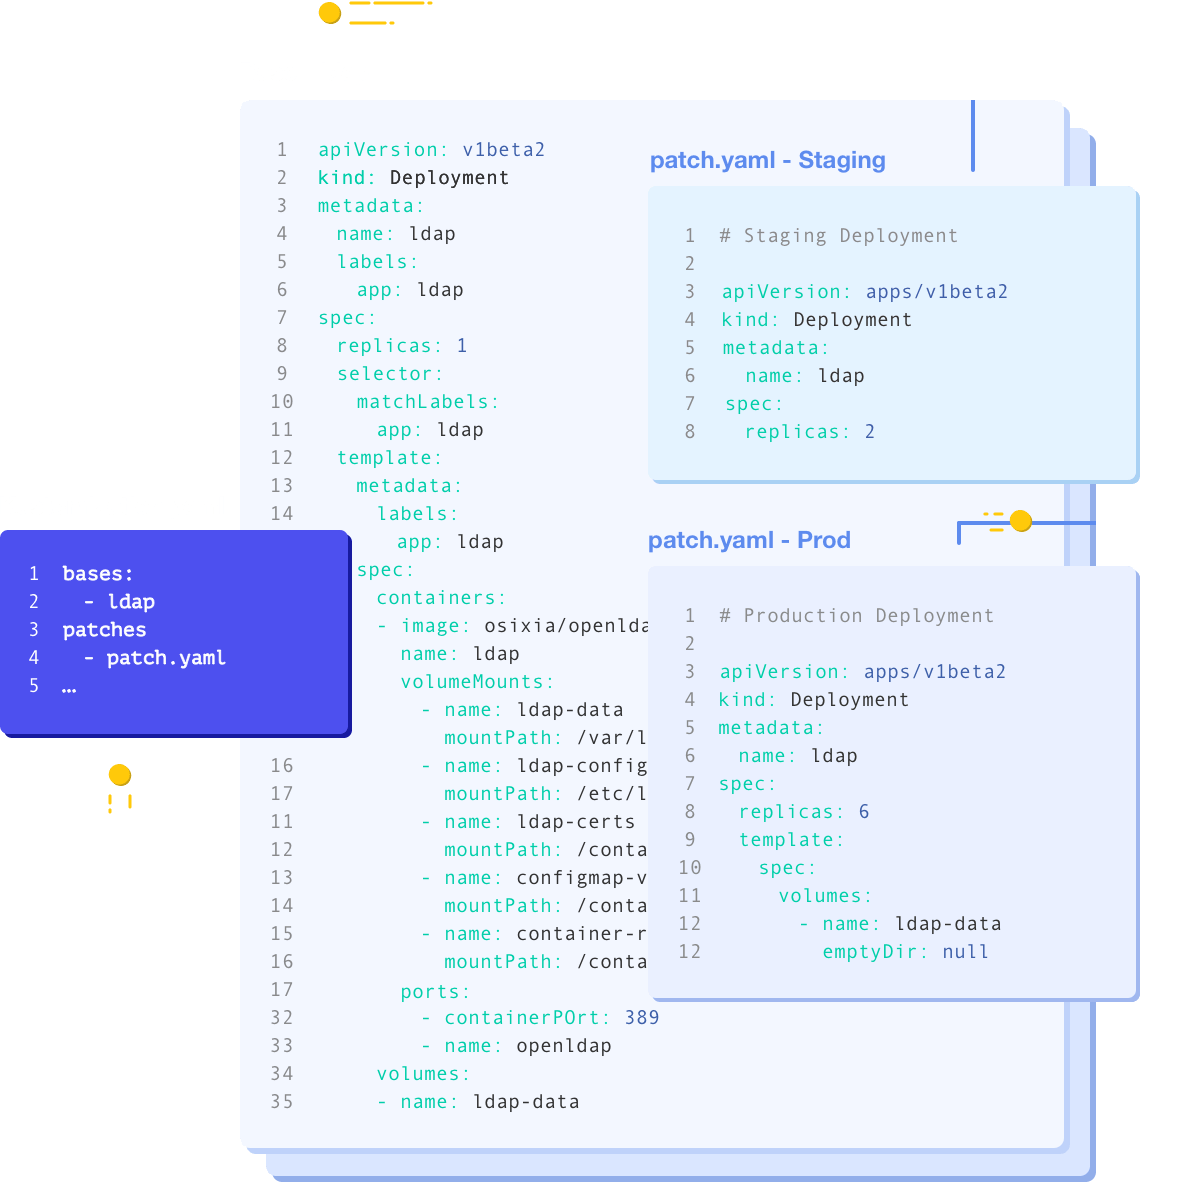
Here’s an example of a Helm chart for deploying a simple HTTP application, such as NGINX:
template.yaml
apiVersion: apps/v1
kind: Deployment
metadata:
	name: {{ .Release.Name }}-deployment
	labels:
{{ include "http-service-template.labels" . | indent 4 }}
spec:
	replicas: {{ .Values.replicaCount }}
	selector:
	matchLabels:
{{ include "http-service-template.labels" . | indent 6 }}
	template:
	metadata:
		labels:
{{ include "http-service-template.labels" . | indent 8 }}
	spec:
		serviceAccountName: {{ .Release.Name }}-service-account
		containers:
		- image: {{ .Values.image.repository }}:{{ .Values.image.tag }}
			name: {{ .Release.Name }}
			ports:
			- containerPort: {{ .Values.containerPort }}
			env:
			{{- range .Values.env }}
			- name: {{ .name | quote }}
				value: {{ .value | quote }}
			{{- end }}
---
apiVersion: v1
kind: Service
metadata:
	name: {{ .Release.Name }}-service
	labels:
	app: {{ .Release.Name }}
	service: {{ .Release.Name }}-service
spec:
	ports:
	- port: 80
	protocol: TCP
	targetPort: {{ .Values.containerPort }}
	selector:
	app: {{ .Release.Name }}
my-application.yaml
version: v1
replicaCount: 1
image:
	repository: nginx
	tag: 1.23.3
containerPort: 80
env:
	- name: "TEST_ENV"
	value: "FOO"
You can install an application using the helm CLI with the following command:
helm install -f sample-values.yaml sample-service .
To update the application (for example, after making changes), you would use:
helm upgrade -f sample-values.yaml sample-service .
If you need to delete the application, you can do so with:
helm uninstall sample-service
GitOps
So far, we’ve explored one way of interacting with the cluster - directly via commands. This model is called push-based, as we are pushing commands to our cluster for desired changes to be applied.

In the DevOps world, a new practice is becoming increasingly familiar: GitOps. This term emphasizes the importance of keeping all our infrastructure and configuration in source control, where it can be versioned, reviewed, and tested.
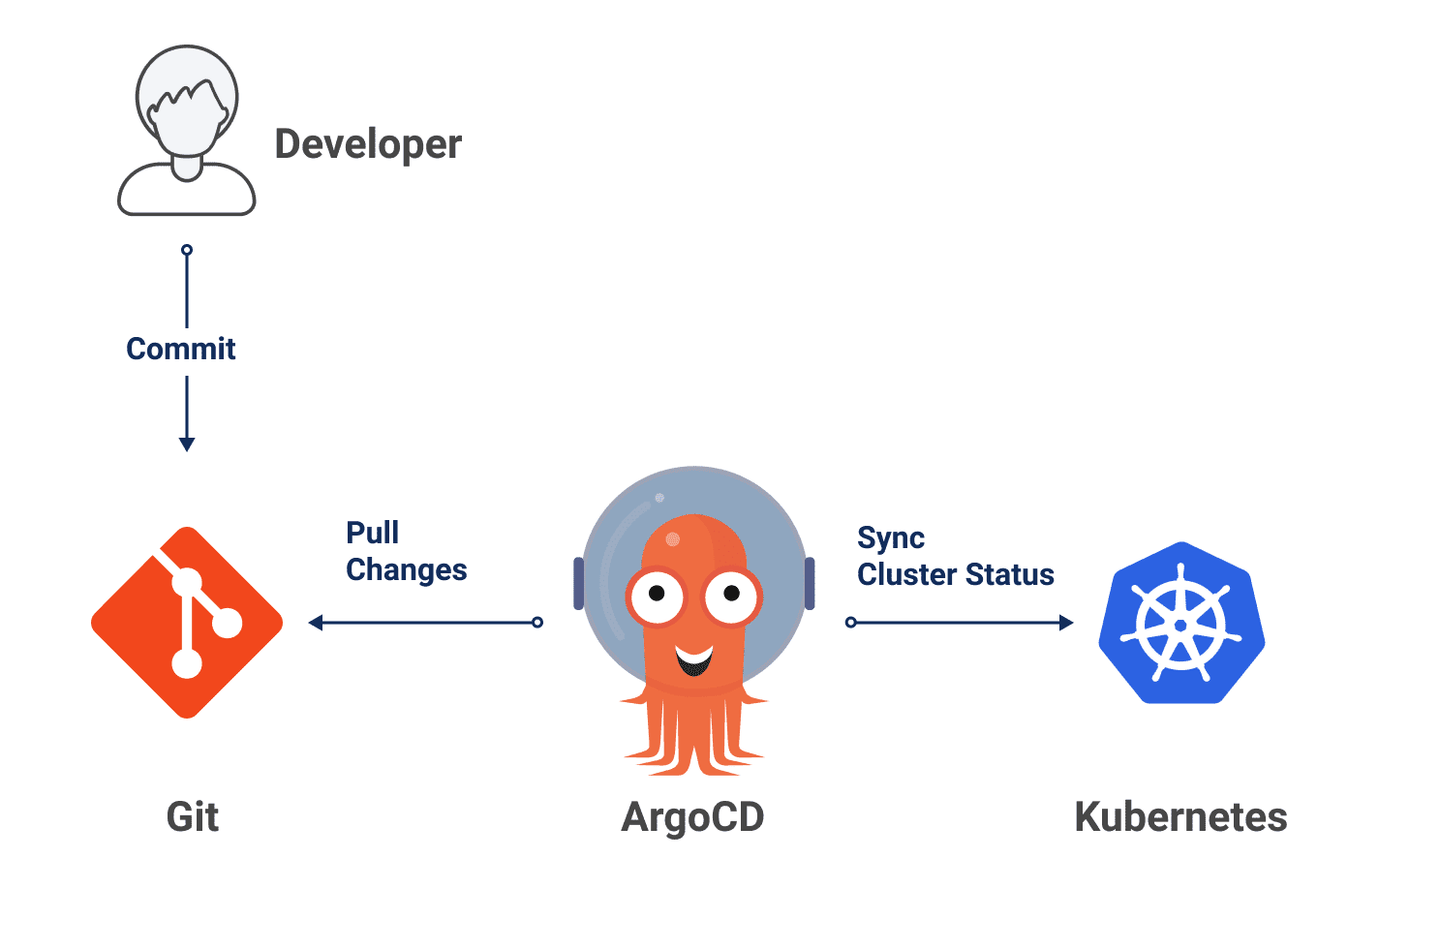
By storing all of our manifests in Git, the cluster can pull those manifests from Git and apply them once they change. As a result, we adopt a pull-based approach:

This approach offers several benefits:
- All resources are created from versioned manifests - no more manually created resources.
- Accountability - know who changed what and when.
- Easier rollback - simply revert to a previous commit.
- No need to grant access to your cluster to other systems (e.g., Jenkins).
ArgoCD is the most popular tool for implementing pull-based deployments. I haven’t tried it yet in production scale, but I’ve heard that the learning curve can be quite steep.
Wrap-up
I hope you found this informative and enjoyable, and that you learned a thing or two along the way. You should now have a solid foundation to understand some basics of Kubernetes and the buzzwords associated with it. Happy Kubernetes exploring!

Additional Resources
- https://www.freecodecamp.org/news/learn-kubernetes-in-under-3-hours-a-detailed-guide-to-orchestrating-containers-114ff420e882
- https://www.youtube.com/watch?v=ZpbXSdzp_vo&ab_channel=Devoxx
- https://head-first-kubernetes.github.io/
- https://www.youtube.com/watch?v=BE77h7dmoQU&ab_channel=Honeypot
- https://www.youtube.com/watch?v=318elIq37PE
- https://www.manning.com/books/kubernetes-in-action
- https://www.youtube.com/watch?v=PziYflu8cB8&ab_channel=Fireship
- https://www.gitops.tech/
- https://www.youtube.com/watch?v=MeU5_k9ssrs&ab_channel=TechWorldwithNana
- https://www.youtube.com/watch?v=-ykwb1d0DXU&ab_channel=TechWorldwithNana
- https://www.youtube.com/watch?v=16fgzklcF7Y&ab_channel=TechWorldwithNana